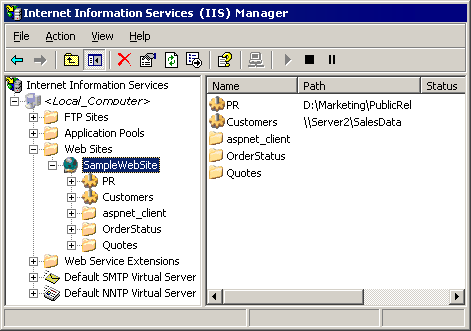
If response files get persisted on local server, you should provide means for persisted data packets to be visible to the outside clients. If you're using Internet Information Services (IIS), it is suggested that you use virtual directory for that purpose. Resulting file link, displayed in response e-mail message, points to prepared response data packet. Virtual directories is being managed by Internet Information System (IIS) Manager application.
Using Virtual Directories
A virtual directory is a friendly name, or alias, either for a physical directory on your server hard drive that does not reside in the home directory, or for the home directory on another computer. Because an alias is usually shorter than the path of the physical directory, it is more convenient for users to type. The use of aliases is also secure because users do not know where your files are physically located on the server and therefore cannot use that information to modify your files. Aliases also make it easier for you to move directories in your site. Rather than changing the URL for the directory, you change the mapping between the alias and the physical location of the directory.

Internet Information System (IIS) Manager
Please make distinction between following:
For example, if response data packet file name is file.zip:
Physical location |
Domain prefix |
Virtual directory |
Resulting e-mail link |
C:\Responses |
http://www.mycompany.com |
..\Data |
http://www.mycompany.com/data/file.zip |
D:\Projects\Responses |
http://www.mycompany.com |
..\Data |
http://www.mycompany.com/data/file.zip |
\\Path\Data |
http://www.mycompany.com |
..\Data |
http://www.mycompany.com/data/file.zip |
C:\Responses |
http://www.mycompany.com/test |
..\Data |
http://www.mycompany.com/test/data/file.zip |
D:\Projects\Responses |
http://www.mycompany.com |
..\Data\Folders |
http://www.mycompany.com/data/folders/file.zip |
There are three ways to create or delete a virtual directory:
|
You must be a member of the Administrators group on the local computer to perform the following procedure or procedures. As a security best practice, log on to your computer by using an account that is not in the Administrators group, and then use the runas command to run IIS Manager as an administrator. At a command prompt, type runas /User:Administrative_AccountName"mmc %systemroot%\system32\inetsrv\iis.msc" |
Create Virtual Directory Using Virtual Directory Creation Wizard
Create Virtual Directory By Importing Configuration File
Create Virtual Directory Using Windows Explorer
|
You must be a member of the Administrators group on the local computer to run scripts and executables. As a security best practice, log on to your computer by using an account that is not in the Administrators group, and then use the runas command to run your script or executable as an administrator. At a command prompt, type runas /profile /User:MyComputer\Administratorcmd to open a command window with administrator rights and then type cscript.exeScriptName (include the script's full path and any parameters). |
Create Virtual Directory Using Administration Script