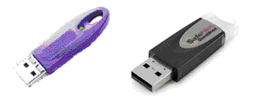
The stand-alone USB key is a physical, tamper-proof hardware device (also known as a "dongle") which protects Infra Suite-based product from unauthorized use. A software driver necessary for running the key of user's operating system is already built-in into the product setup. USB key-based stand-alone licensing is floating in nature - in this particular case "floating" means that it's not tied to any specific workstation and can be freely transferred from one computer to another. User may create several product installations on multiple workstations and run any of them (at a time) using the same hardware key.
This kind of licensing is suitable for small and medium-sized organizations. It's suited for users who use either single workstation or several computers during their everyday job (e.g. a desktop workstation at the office and a laptop computer in the field). It makes it easier to simply plug out the USB key from one computer and plug it back in into another one, without even "stopping" it as you would do with standard USB memory stick. Although USB key visually resembles to an USB memory stick, their functionalities completely differ.

|

|
USB-port keys
|
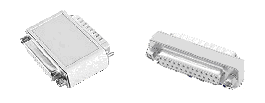
Parallel-port keys
|
Enabling USB Key-based License Model
On supported Windows operating systems:
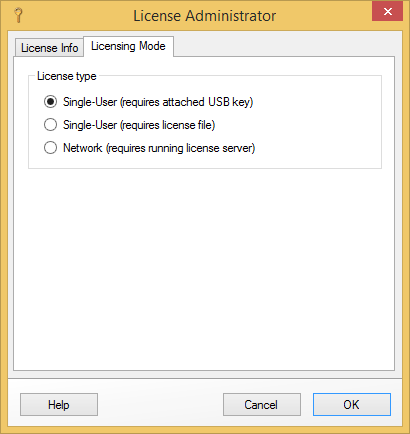
- Run the License Administrator tool.
- Once License Administrator dialog opens, select Licensing Mode tab page.
- Select Single-User (requires attached USB key) option.
- Click OK button to close the dialog and confirm switching to newly selected licensing model.

License Administrator's USB key-based licensing mode
Attaching Hardware Key
Locate an available USB or parallel port on your computer, depending on the type of the hardware key. Then attach the key to the port. Make sure it is securely and tightly connected. For USB keys - look to see that the LED on the key is illuminated to verify whether the key has been plugged-in properly. Please take a note on the following tips when attaching a hardware key:
- Your computer is close to wall - if your computer is close to a wall or other obstacle and you are using a parallel port compatible key, you can first attach an extension cable to the port, then attach the key to the cable. Use a straight-through DB-25 male to DB-25 female cable.
- Connecting multiple parallel port keys - multiple keys can be attached to the same parallel port; this is called cascading or daisy-chaining. Sentinel parallel port driver supports up to 5 keys attached to a port. Keys can also be connected to up to three parallel ports on the same computer. The Sentinel Driver automatically polls all ports when looking for a key. The SuperPro keys can also be cascaded with other Sentinel keys that support cascading. Make sure the SuperPro keys are the last in the chain (farthest from the computer).
- Connecting multiple USB port keys - multiple USB port keys can be attached using a USB configuration hub. Sentinel USB port driver supports up to 32 keys attached to a configuration hub. You may however use a USB hub or an extension cable with type "A" male end, and a type "A" female end connector to make it convenient to attach a key when the port is near to a wall or obstacle.
- Sentinel Protection Server - works in conjunction with the Sentinel USB and parallel drivers. It can support a maximum of 10 SuperPro keys, but is limited by the type of keys used.
- When you have only one parallel port - if your computer has only one parallel port, you may need to temporarily remove any existing parallel port devices (such as a Zip drive or printer) in order to connect the key. These devices may be reconnected to the key's outside connector after you have installed the key. The parallel port key is capable of working with most Zip drives, tape backups and other bidirectional devices.
- Support for user-configured, parallel port PCI cards - the Sentinel Driver supports user-configured, PCI parallel port cards. The Sentinel System Driver version 7.5.0 (and higher) will be able to automatically detect the PCI cards attached to a system.
- Using cables with the key - due to the large variety of cables currently on the market, we do not recommend a specific brand or type of cable for use with the SuperPro key, nor do we guarantee that all cables will be compatible with the key. However, we do recommend the following:
- Cables should not be longer than 6 feet in length.
- Cables should be shielded.
- Do not use ribbon cables.
- Cables must be straight-through; that is, they must have all pin signals wired through to the connectors on either end of the cable.
- Recommendations for attaching a 25-pin key - if you are using a parallel 25-pin key, we recommend you attach the key directly to the parallel port without using an extension cable between the computer and the key. If necessary, reconnect any other parallel port devices to the outside connector on the key. We recommend using a shielded printer cable if you are connecting a printer to your computer through the key. Please be aware that not all combinations of cables and printers are compatible with the key. Please contact your software vendor if you encounter a compatibility problem.
Verifying Sentinel System 32-bit Driver (USB Port)
Steps for verifying whether Sentinel System Driver (USB Port) is properly installed on 32-bit or 64-bit Windows 2000/XP/Vista/7/8/10 or Windows Server 2003/2008/2012/2016 operating systems:
- From the Start menu, point to Settings and click Control Panel.
- Double-click Administrative Tools.
- Double-click Computer Management.
- Select Device Manager. A list of the various devices is shown on the right-side pane.
- Expand the Universal Serial Bus controllers parent item. If a Sentinel USB key is plugged-in, SafeNet USB SuperPro/UltraPro will be shown.
Verifying Sentinel System 32-bit Driver (Parallel Port)
Steps for verifying whether Sentinel System Driver (Parallel Port) is properly installed on 32-bit Windows 2000/XP/Vista/7/8/10 or Windows Server 2003/2008/2012/2016 operating systems:
- From the Start menu, point to Settings and click Control Panel.
- Double-click Administrative Tools.
- Double-click Computer Management.
- Click View on the menu bar.
- Enable the Show hidden devices option. The Non-Plug and Play Drivers item will appear on the right-side pane.
- Expand the Non-Plug and Play Drivers.
- Double-click Sentinel. The Sentinel Properties dialog box appears.
- Click the Driver tab. Here you can verify the current status of the Sentinel System Driver (parallel port).
Verifying Sentinel System 64-bit Driver (Parallel Port)
Steps for verifying whether Sentinel System Driver (Parallel Port) is properly installed on 64-bit Windows 2000/XP/Vista/7/8/10 or Windows Server 2003/2008/2012/2016 operating systems:
- From the Start menu, point to Settings and click Control Panel.
- Double-click Administrative Tools.
- Double-click Computer Management.
- Click View on the menu bar.
- Enable the Show hidden devices option. The Non-Plug and Play Drivers item will appear on the right-side pane.
- Expand the Non-Plug and Play Drivers.
- Double-click Sentinel64. The Sentinel64 Properties dialog box appears.
- Click the Driver tab. Here you can verify the current status of the Sentinel System Driver (parallel port).
