Microsoft Windows offers support for adding proxies inside Internet Explorer's settings. You can configure the proxy server and port to support the different protocols you use for accessing services that require a proxy within your organization. You can enable or disable proxy settings on a per-connection basis as well as for the LAN. You should enable proxy settings only when using a proxy is required. If you enable proxy settings and a proxy is not required, you won't be able to use the related connection to access the Internet or resources on your network. This happens because your computer will look for a proxy that isn't there. Malware programs sometimes target your proxy settings, and you may have to enable or disable these settings as a result.
You can configure a proxy for a LAN connection by completing these steps:
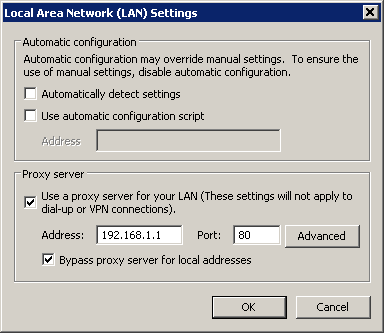
Configuring LAN proxy settings as necessary
You can configure a proxy for a dial-up or VPN connection by completing these steps:
Whenever you change network connection settings, you should verify that you can establish a connection and access resources. If you are having difficulty connecting to the Internet after changing your connection settings, check your proxy settings in Internet Options to enable or disable your proxy configuration as appropriate for each connection.
|
If you use a different web browser than Internet Explorer , such as Mozilla Firefox, that browser may have its own proxy settings that you must configure using its settings or options dialog. Some browsers, such as Google Chrome, use the system-wide proxy settings that you learn to configure in this section. |
